How Many Coats of Paint Do I Need? A Simple Guide for Surfaces and Paint Types

David Kranker • March 8, 2024

When starting a new painting project, whether interior or exterior, it’s important to know how many coats of paint you’ll need and how long to wait between coats to ensure optimal results.


If you’re new to painting, you may feel overwhelmed by the different types of paint available and the decision of which paint to use for your project. To help you choose the right paint and answer the age-old question, “How many coats of paint do I need?” We’ve created a simple guide that explains how to paint common surfaces successfully.


Remember, you can always call VanDerKolk Painting to guarantee a perfect and precise residential, commercial, or industrial paint job, no matter how big or small!


Number Of Paint Coats By Surface


Many interior and exterior home projects require painting. To ensure a well-done and vibrant paint job, you’ll need to choose the right type of paint and apply the correct number of coats.


Number Of Coats For Bare Drywall


Paint Coats Required

  • 1 Coat of Primer
  • 1 Coat of Paint
  • Or 2 Coats of Paint-Primer Combo


If you’re renovating a home or working with new construction, you’ll be faced with bare drywall to cover up with your favorite paint color.


The best type of paint for this surface is water-based paint, such as latex or acrylic paints. If you use a primer-paint combination, then you can apply two coats. Or you can apply one coat of primer and one coat of your colored paint.


Number Of Coats For Light-Colored Walls


Paint Coats Required

  • 1 Coat of Primer
  • 1-2 Coats of Paint (depending on the new color)


Often, you’ll find yourself painting over previously painted walls. When covering a light-colored wall, the number of coats can depend on whether you are painting over it with a similar or darker color.


The best type of paint for light-colored walls is water-based paint, such as latex or acrylic. It’s best practice to apply a primer coat before your color paint. If painting a darker color, you may only need one coat with a few added touch-ups. It's best to apply two coats when painting a similar or lighter color.


Number Of Coats For Dark-Colored Walls


Paint Coats Required

  • 1 Coat of Primer
  • 2-3 Coats of Paint


Painting over a dark-colored wall can be tricky and often more time-consuming than light-colored or bare walls. Don’t let this discourage you, though!


With the right number of coats of paint, you can make that unwanted dark color disappear. The best type of paint for dark-colored walls is water-based paint, such as latex or acrylic.


After applying one coat of primer, you will need two to three coats of paint to fully cover the underlying dark color. Examine the wall after applying the second coat and determine if you need a third coat if you see dark, patchy spots.


Number Of Coats For Finished Wood


Paint Coats Required

  • 1 Coat of Primer
  • 2 Coats of Paint


Painting finished wood projects, such as furniture, interior doors, baseboards, or trim, can instantly transform a room—when you use the right paint and the correct number of coats.


The best type of paint for finished wood projects is stain, acrylic latex, or oil-based paint. Be careful with oil-based paint indoors, though, as it requires extra ventilation due to harmful VOC chemicals in the paint.


Painting over finished wood requires extra steps, such as sanding the surface. After sanding, you’ll add one coat of primer. When the primer has dried, lightly sand the surface again before applying two coats of paint. Additionally, you can also use a lacquer, which requires multiple thin coats to cover the surface.


Number Of coats For Metal


Paint Coats Required

  • 1 Coat of Primer
  • 2 Coats of Paint


Painting metal surfaces, especially when painting over rusted metal, can elevate your object in a matter of minutes.


If your project is prone to rust, then it’s recommended to use a rust-inhibiting primer to prevent rust from forming due to humidity or moisture. Just one coat of this is enough.


The best type of paint for metal surfaces is oil-based paint. It’s long-lasting and the color is often more vibrant compared to water-based paints, which makes it perfect for outdoor metal items and projects.


After adding one coat of primer, preferably rust-inhibiting primer, you’ll apply two coats of oil-based paint for the best results.


Number Of Coats For Vinyl


Paint Coats Required

  • 1-2 Coats of Paint


Painting vinyl surfaces, such as outdoor fences or garage and basement flooring, is one of the simplest surfaces regarding the number of coats. If the vinyl is in good shape, then there is no need for a primer; you can go straight to the paint!


The best type of paint for vinyl surfaces is epoxy or latex acrylic paint because it is flexible and adheres better. Without a primer coat, you’ll only need one to two coats of paint to transform your vinyl object.


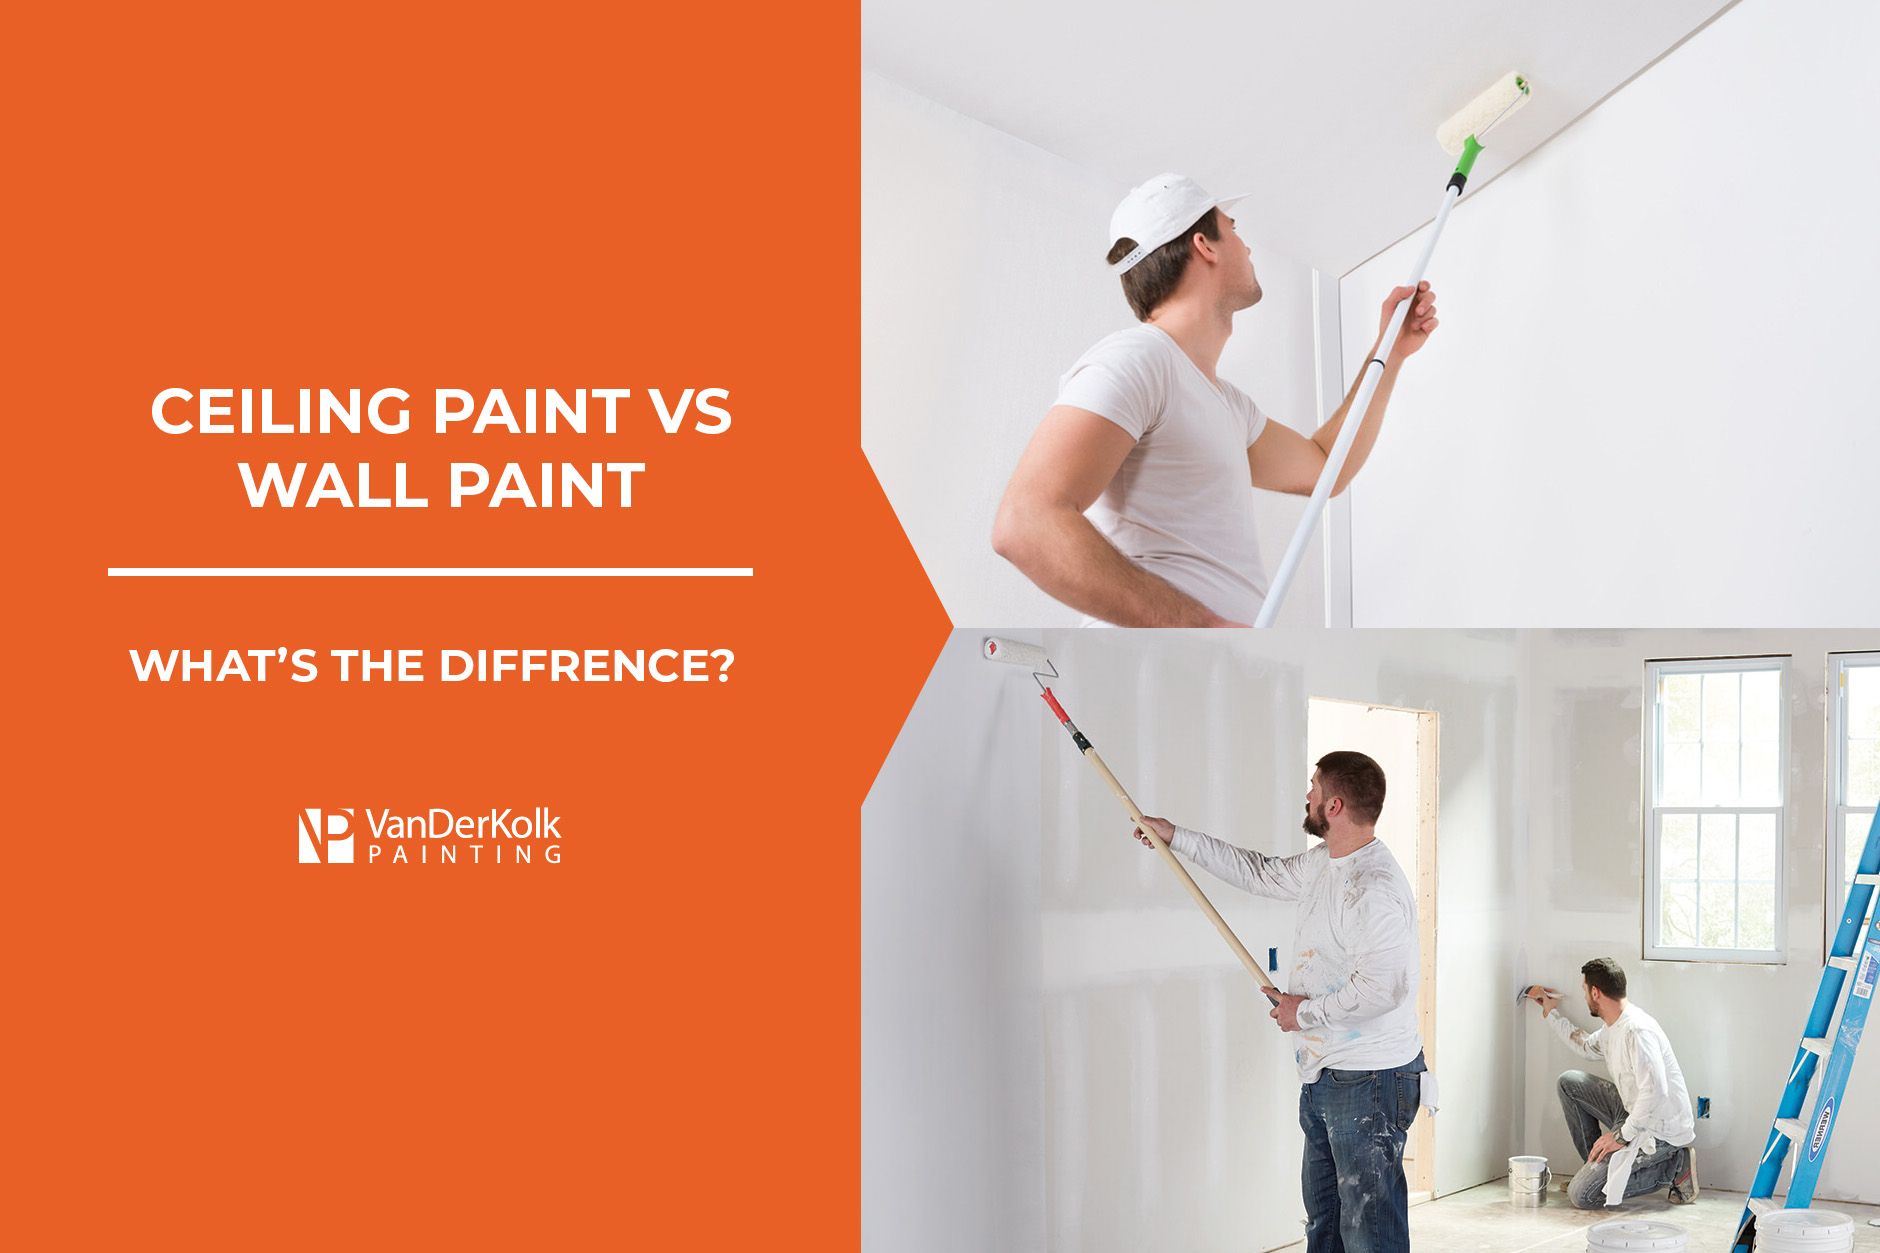
Number Of Coats For Ceilings


Paint Coats Required

  • 1 Coat of Primer (optional)
  • 1-2 Coats of Paint


Painting a ceiling can drastically transform a room, whether it’s a subtle white or an exciting color that matches your interior decor. To ensure your ceiling is perfect and pulls the room together, you must understand how to paint it correctly.


The best type of paint for ceilings is water-based paints, such as latex and acrylic. If you’re painting a ceiling that is already white, you can forego adding a coat of primer before the paint.


Whether you use a primer or not, you’ll need one to two coats of paint, depending on the color you’re painting over and the color you’ve chosen.


Number of Coats According to Paint Type


We’ve reviewed the most commonly painted surfaces and the number of coats they require. Now, let’s explore the number of coats of each type of paint you’ll likely use.


  • Oil-Based Paint - 1-2 coats
  • Acrylic Latex Paint - 2 coats
  • Latex Paint - 2-3 coats
  • Enamel Paint - 2 coats
  • Chalk Paint - 2 coats
  • Milk Paint - 2 coats
  • Wood Stain - 1-2 coats
  • Epoxy Paint - 1-2 coats


Examining your project is the best way to determine if you should add another coat of paint. If the underlying paint color still shows through or there is uneven color, you may need an additional coat of paint.


Always allow the coat to dry long enough before adding another, or it could result in peeling, flaking, or bubbling.


Guarantee A Perfect Paint Job VanDerKolk Painting


Choosing the right type of paint and knowing how many coats you need for your project can feel overwhelming and mysterious. To guarantee a pristine and perfect paint job, consider hiring the professional painters at VanDerKolk Painting!


Our team of trained and professional painters ensures your painting project, no matter how big or small, is done with precision, care, and detailed attention. Request a free estimate for your residential or commercial painting project today!

By David Kranker January 15, 2025
Choosing the right paint color for your commercial building is a more nuanced and impactful decision than selecting colors for your home . Factors such as branding, customer perception, and the surrounding environment play a significant role in this decision. The color of your commercial building holds much more weight than you probably realize. It can influence how potential customers perceive your business and even their decision on whether to enter or not. Don’t worry; VanDerKolk Painting , we’ve helped countless businesses in Grand Rapids and beyond find the perfect colors that not only look great but also support their business goals. Below, we’ll guide you through the importance of commercial building color, offer tailored recommendations for different business types, and provide practical advice to make your decision seamless and informed. Why the Color of Your Commercial Building Matters Your commercial building’s exterior is more than just a structure; it’s a powerful marketing tool. Just as you carefully select branding materials like logos and advertisements, your building’s color is a visual extension of your brand identity. A thoughtfully chosen exterior paint color can enhance brand recognition and increase awareness by 80% . Simply through your building’s color, you can also influence customer perception of your brand, set expectations, and build trust with potential and returning customers. Plus, creating a great first impression on new customers or clients is a major win! Best Modern Commercial Building Colors It’s important to recognize that certain colors work better for certain businesses. So, below is a list of the best commercial building colors based on the type of commercial business. 
By David Kranker January 8, 2025
Over time, the exterior paint on your home can fade or crack from exposure to the elements. As you look to enhance your curb appeal, especially when spring and summer are coming, many homeowners have an itch to repaint exterior structures, such as their homes, fences , garages , and sheds. But before you set aside a weekend to tackle this exterior painting project , it’s important to plan accordingly with the weather. The temperature and humidity play a major role in the quality and result of your exterior painting project. If you’re looking to take on exterior painting in the next few weeks, you have to ask yourself, when is it too cold to paint outside? At VanDerKolk Painting , we aim to provide the highest-quality painting project results and information to our Michigan residents . So, before you grab your paintbrush and ladder, we’re diving into safe temperature ranges for exterior paint and when is the best time to paint outside! When is it Too Cold to Paint Outside? It is too cold to paint outside if the temperature is below 50℉ during the day or below 32℉ at night. For Grand Rapids residents, this means that you should hold off on exterior painting projects from December to March. What is the Ideal Temperature for Exterior Painting? The ideal temperature range for exterior painting depends on the type of paint you use. For latex paint, the best temperature range is between 50℉ and 85℉. However, some latex paint formulas can withstand temperatures down to 35℉. For oil-based paint, the range is a bit wider, allowing you to paint in temperatures from 40℉ to 90℉. It’s always important to read the instructions on the type of paint you buy to learn more about the ideal temperature range for that specific formula. How Does Temperature Affect Exterior Paint? You may feel inclined to ignore our recommendations about the ideal temperature ranges for exterior painting, but we offer this advice with good reason! Temperatures that are too cold or too hot can cause all of your hard work to end in a poor result. Cold Temperature Effects on Exterior Painting When the temperature is below 50℉, the colder weather can have negative effects on your exterior painting project. These include: Slow Dry-Time - Cold weather can cause the paint to dry slowly and not cure properly, resulting in poor adhesion, cracks, and peeling . Moisture Issues - Cold weather increases the formation of dew on surfaces, which can cause poor adhesion of the paint. Freezing - If water-based paint is used, it could freeze, making the paint unusable or causing an uneven texture if it is already applied. Brittle Finish - Paint applied in very cold temperatures can have a brittle finish and less durability over time. Hot Temperature Effects on Exterior Painting Temperatures above 85℉ can also disrupt or ruin your exterior painting project results. These effects include: Too Fast Dry-Time - If the paint dries too quickly due to the heat or sun, it can result in poor adhesion and the appearance of brush strokes or roller marks. Blistering - When painting in hot temperatures or direct sunlight, it could cause the top layer of paint to dry before the coat underneath, resulting in moisture build-up and blistering paint. Weakened Durability - Painting in high temperatures can cause the paint to lose elasticity, resulting in cracks and a less durable product. Temperature Fluctuation Effects on Exterior Paint It isn’t just the daytime temperature you must pay attention to when painting outside. You also have to consider the drop in temperature as the sun sets and during the night. Major fluctuations in temperature can cause the surface to which the paint has been applied to expand and contract, resulting in poor adhesion of the paint. Additionally, if the paint hasn’t had time to cure during the day before the nighttime temperatures drop, it could result in the paint not properly setting or curing. Does Humidity Affect Exterior Painting? Now, we know that the best temperatures to paint outside are between 50℉ and 85℉, but you also have to account for the humidity. Painting in environments with too much or too little humidity can cause your paint to peel, crack, or bubble. The ideal humidity range is between 40% and 70%. High humidity can cause delayed dry time, mold and mildew growth, poor adhesion, blistering, and uneven texture. Check out our blog post with tips for painting in high humidity , which is very common in Grand Rapids, Michigan! While low humidity can cause the paint to dry too quickly, which can result in poor leveling and the appearance of brush strokes. When is the Best Time to Paint Outside? For residents of Grand Rapids, Michigan, the best time of year for exterior painting is from April to July . The temperatures and humidity levels are within the ideal range for painting with latex exterior paints. Before you choose a weekend or day to start your exterior painting project, there are some factors you should consider. Temperature In general, painting outdoors in the spring or autumn months offers the ideal daytime temperatures with no significant drop at night. Of course, this will depend on where you live. So, keep an eye on the weather and for any heat waves or cold fronts coming your way. Remember, the best temperature range for acrylic paint is 50℉ to 85℉ and 40℉ to 90℉ for oil-based paint. Humidity Remember to check the humidity levels and temperatures. You want to aim for days that are between 40% and 70% humidity. Clear Skies Rainy days can definitely ruin an exterior painting project. When looking at the forecast, make sure that rain is not expected within 48 hours after you have finished your painting. Aim for Mid-Morning Painting The best time of day to paint outside is mid-morning. This allows the day to become warm enough to paint and for the paint to dry before the night temperatures begin the drop, ensuring optimal adhesion and curing. Pro Tip: Consider the Surface Temperature Throughout this blog post, we’ve mostly been talking about the temperature of the air. But the temperature of the surface that you wish to paint is also extremely important! If the surface temperature is too hot or cold, then it could affect how well the paint applies and dries. For surfaces that are in direct sunlight, they will likely be hotter than the air temperature. Surfaces that are in the shade will likely be cooler. This is important to consider before starting your exterior painting project. Enhance Your Curb Appeal This Spring with VanDerKolk Painting Winter is the best time to plan your home improvement projects once springtime rolls around—including painting your home’s exterior, garages, sheds, or fences. And there is no better way to do it than with professional help from VanDerKolk Painting ! For more than 30 years, our team of expert painters has helped Grand Rapids residents and businesses transform the exterior of their homes and businesses with a fresh coat of paint. We’ll decide the perfect time to get the job done as well as the best paint for your project to ensure long-lasting results. Get a free estimate for your exterior painting project today!
By David Kranker December 20, 2024
When it comes to achieving the perfect look and feel for your concrete floors, finishing them professionally is key. Properly finished concrete floors not only enhance the durability and functionality but also elevate the aesthetics of your space. A well-finished concrete floor becomes not just a foundation but a stunning focal point that complements any décor style in homes, garages, retail stores, gyms, warehouses, and more. Properly finishing your concrete floor is about integration—it forms a seamless blend of strength, beauty, and ease. Choosing professional finishing for your concrete floors has many perks. It makes your floors last longer by protecting them from damage, keeping them strong for years. Plus, a polished finish can make them look sleek and stylish, which is sure to boost the appeal of your home or business. Finished concrete floors are also easier to clean and maintain since they resist stains. In this blog post, the concrete coating professionals at VanDerKolk Painting will dive into how to finish concrete floors, the different types of finishes, and how you can choose the right company to professionally finish your concrete floors. What is Concrete Floor Finishing? Concrete floor finishing is all about making a concrete floor look better and last longer. This involves getting the concrete ready, using different treatments, and giving it the right texture for its intended use. Finishing turns plain concrete into a useful and nice-looking surface that's easier to keep clean and can handle daily use better. It's used everywhere, from shiny floors in homes to heavy-duty surfaces in warehouses. Types of Concrete Floor Finishes There are several different types of finishes you could apply to your concrete floors. Each finish will provide a different appearance. A polished concrete finish is popular for its smooth, shiny surface that bounces light around and gives a modern look. It turns plain concrete into something that looks almost like a mirror. Polished concrete is durable, relatively inexpensive, and easy to clean. An epoxy concrete finish is ideal if you want something strong and colorful. This involves coating the concrete with epoxy resin, creating a glossy and tough surface that's great for busy areas like garages and businesses. It's also great for handling spills and stains. The stained concrete finish creates a natural color with acid or water-based stains that soak into the concrete. This gives a unique, varied look with deep shades, perfect for making living areas more attractive. The downside to staining concrete is that it’s purely an aesthetic improvement. Staining doesn’t enhance the performance of your floor like polishing products or epoxy does. How to Finish Concrete Floors You're ready to embrace a change and finally elevate your concrete floors by adding a professional finish to them. Here's exactly how it's done. Step 1: Take Safety Precautions Before starting the concrete finishing process, make sure you have the right safety gear. Wear gloves, safety goggles, and a mask to avoid breathing in fumes from products like epoxy or stains. It's important to work in a place with good airflow to minimize breathing risks. Keeping safety in mind not only protects you but also makes your project more enjoyable and successful. Step 2: Prepare the Surface Start by cleaning the concrete with water and an effective cleaner to remove dirt, debris, and old coatings. This step is important because a clean floor helps the finish stick better and last longer. To remove old coating or finishes, you may need to use chemical strippers or mechanical methods like grinding. Concrete grinding helps smooth out rough spots and eliminate any leftover debris. By doing this, you set up a clean base that helps the finish go on better. A smooth surface is key for a strong, even application that will make the floor look great and last a long time. Once it's clean, look for imperfections and fix any cracks using a concrete patching compound. Fixing these will make the surface look better and help the finish go on evenly. Preparing the surface well is the key to a professional and lasting concrete floor finish. Step 3: Choose the Right Finish When choosing a concrete floor finish, think about how the floor will be used and address the specific needs of your space. For outdoor areas, slip-resistant coatings provide extra safety by reducing the risk of slips and falls, especially in wet conditions. If your concrete space is bathed in sunlight, UV-stable finishes are an excellent choice. These finishes protect against fading and discoloration caused by UV rays, maintaining their vibrant appearance over time. Each finish requires different maintenance and care, so consider what you can manage and how it looks and lasts. Step 4: Apply Primer and Finish Priming is an important step for a great concrete floor finish if you’re using a stain or epoxy. We recommend using a concrete-specific primer so that the finish sticks well. Start by making sure the floor is clean and dry. Use a roller or brush to spread the primer evenly over the floor. Be sure to check the drying times provided by the manufacturer before you move to the finishing step. If you are polishing your concrete floor, then there is no need to prime the floor. Applying the finish depends on the type you pick. Stain - use a sprayer to spread the stain evenly, allowing for a smooth look and avoiding streaks and inconsistencies. Epoxy or Polyurea - use a squeegee or roller in a criss-cross pattern for even coverage. Step 5: Cure and Seal Giving your concrete floors enough time to cure is key to making sure they last. This step makes the finish strong and able to resist wear over time. If you rush, the floor might wear out or get damaged too soon. After curing, applying a high-quality sealant is necessary if you’ve used a stain or epoxy finish. Sealants protect against stains, spills, and normal use. They also improve the concrete's appearance, with options from matte to glossy, and help it last longer. Is it Better to Seal or Paint Concrete Floors? Deciding between sealing and painting your concrete floors largely depends on the aesthetic and functional needs of your space. Sealing preserves the natural appearance of the concrete while providing a protective, easy-to-clean surface that resists moisture and stains. It's a great choice if you appreciate the industrial look of raw concrete. On the other hand, painting offers a range of color and design possibilities, allowing for more creativity and personalization. However, painted floors might require frequent maintenance to avoid chipping or peeling. Ultimately, consider your desired look, usage, and maintenance preferences when choosing between the two options. How Long Does Painted Concrete Last? Painted concrete can be a long-lasting flooring solution, typically lasting between three to five years before needing a touch-up or reapplication. The longevity depends on factors such as the quality of the paint, the preparation of the surface, and the level of foot traffic in the area. For example, epoxy can last 10 to 20 years on residential concrete floors. High-quality paints formulated specifically for concrete tend to offer the best results. Ensuring a clean, well-prepared surface can also significantly extend the paint's lifespan. A protective sealant can safeguard the finish against wear and tear while making it easier to maintain a fresh, vibrant appearance. Maintenance and Care Tips for Finished Concrete Floors Keeping your finished concrete floors looking great is easy with regular cleaning and checks. Start by sweeping or vacuuming to get rid of dust and dirt. Then, mop with a pH-neutral cleaner. This gentle cleaner helps keep the floor’s finish in good shape. Avoid using strong chemicals that might damage the surface. Besides cleaning, it's important to check your floors regularly. Every few months, look for signs of wear like scratches, chips, or fading. Fixing these early prevents bigger problems later. Reseal your floors every two to three years or as needed to keep them durable and looking great. Some higher-quality sealants can last between five and ten years. By following a simple cleaning routine and checking for wear, your concrete floors will stay impressive for years. Choose VanDerKolk Painting to Professionally Finish Your Concrete Floors When it comes to transforming your concrete floors, trust the expertise and experience of VanDerKolk Painting . With a remarkable reputation in the Grand Rapids area, we have honed their skills in concrete floor finishing over the years. Our commitment to delivering high-quality workmanship ensures that your floors will not only look stunning but also stand the test of time. We pride ourselves on exceeding customer expectations by providing tailored solutions that align with your needs and budget. Don't leave your flooring projects to chance; request a free estimate from VanDerKolk Painting today for a professional and personalized finishing touch.
By David Kranker December 13, 2024
So, you’ve just moved into a new home or your new rental property and notice that there may be something a bit off about the paint. In some rooms, you notice the paint bubbling or peeling, possibly due to low-quality paint or not waiting long enough between coats . Or it could be that mold has been painted over! You have no idea what the previous owners or tenants did to these walls. Some (misinformed) people may slap a coat of paint over some mold and call it a day. But if you’ve read our previous blog answering, “ Can you paint over mold? ” you know it’s not a good idea. If you suspect that mold has been painted over, these are the signs to look out for and what you can do about it! Signs That Mold Has Been Painted Over Unfortunately, covering mold with a coat of paint doesn’t make the problem go away. It simply hides it for a bit but does not remedy the mold situation. Here are some signs that mold has been painted over in your home. 1. Bubbling or Peeling Paint There could be a few reasons for bubbling or peeling paint , but one of the most common is mold growing underneath it. You will likely see this in areas with a lot of moisture, like in the bathroom or the kitchen above the stove. 2. Discoloration or Stains When mold has been painted over, it can start to show through the paint. It often looks like stains on the wall that take on a yellow or brown color. You’ll likely notice these stains through light-colored paint or on the ceiling. 3. Uneven Surface Texture Depending on the type of walls you have, you may notice that the texture is strangely uneven or even bumpy in some areas. This is a tell-tale sign that mold has been painted over. When you run your hand over the area, it will be rough to the touch and is inconsistent with the rest of the wall. 4. Dark Spots Under the Paint One of the less noticeable signs that mold has been painted over is faint shadowy areas on the walls or ceilings . You’ll likely only be able to notice these dark spots in direct light, causing them to go unnoticed in many spaces. 5. Soft or Spongy Wall If you suspect mold is growing underneath the paint on your wall and press on it only to feel that the wall is spongy, soft, or even crumbles, then you have an extreme case that should be addressed immediately. If the wall has been compromised, the mold has grown through the underlying structure. What to Do If You Discover Painted Over Mold in Your Home You’ve determined there is mold under paint in your home now that you know the signs. But what can you do about it? Since some mold can be toxic and harmful to your health , it’s important to address the situation as soon as possible! Identify the Moisture Source Believe it or not, the first step isn’t to get rid of the mold; it’s to identify what is causing the mold to grow. When you address the root issue, you’ll never have to worry about mold growing again. Sometimes, the fix is as simple as adding some more ventilation or a dehumidifier to a room to stop mold from growing. Assess the Extent of the Mold Now, it’s time to tackle the mold problem. Examine and assess just how much mold there is and the space where it has grown so you can create an action plan to get rid of it once and for all. Remove the Paint Using a paint scraper, sandpaper, or a heat gun, remove the paint that is covering the mold. Try to avoid creating too much dust, as the mold spores could mix in and be inhaled by you and your family. Test the Mold When dealing with mold, it’s always a good idea to test it with a home testing kit and see what exactly you’re dealing with. In the case of black mold, you can expect to use harsher products to eliminate it. In some situations where mold is more dangerous, it’s recommended to call in a professional to remedy it. Clean and Kill the Mold If your test comes back that the mold is not toxic or dangerous, then you can go ahead and kill it yourself. There are a couple of methods you can use to clean and kill the mold: Mold remover products Water and bleach - one cup of bleach to one gallon of water Undistilled vinegar Simply wipe the mold with one of these solutions to kill it. Repaint the Area Properly While the mold has been removed, it’s important to use a primer and paint that is either mold or moisture-resistant to prevent mold from growing in the area again. This is just in case your moisture source solution doesn’t work as well as you thought. Check out our article about the best type of paint for bathrooms where mold is most common! Paint Your Home the Right Way with VanDerKolk Painting Painting your home’s interior is often a DIY weekend job, but you risk making major mistakes like painting over mold. That’s why we recommend leaving your painting projects to the professionals at VanDerKolk Painting . With over 30 years of experience, our professional and licensed painters know what they’re doing—and they do it well! We’ll assess the project and the area, choose high-quality paints and primers appropriate for your space, and paint with perfect precision. And if we find mold in the area, we’ll take care of that, too! Why leave your interior painting up to chance? Request a free quote from VanDerKolk Painting for your next painting project today!
By David Kranker November 26, 2024
You’re ready to give your home’s interior a makeover with a fresh coat of paint. So, you go down to your local hardware store ready to choose the perfect paint color. But as you look at the wall of colors and types of paint, you begin to notice there are two different kinds: ceiling paint and wall paint. What’s the difference between ceiling paint and wall paint? Can’t you simply use wall paint on your ceiling? At VanDerKolk Painting , we understand the importance of using specific types of paint on designated surfaces. Our experienced painters are here to share the differences between ceiling paint and wall paint. Whether you decide to spend the weekend painting your room yourself or hire professional painters, it’s essential to understand ceiling paint vs. wall paint to ensure your paint project lasts for years and looks great! What is Ceiling Paint? Ceiling paint is specifically formulated for use on ceilings. It is known for its high viscosity, which means it is thicker than normal wall paint to avoid dripping. The paint’s thickness makes it easier to apply with a paint roller and usually requires just one coat. This is great news for homeowners who decide to take on the DIY ceiling painting project as it requires less effort and damage to your floor or belongings. You can choose from water-based or oil-based ceiling paints, but we recommend water-based paint for indoor spaces. It usually comes in two finish options: flat and eggshell. This means the paint is matte and does not reflect light. What is Wall Paint? Wall paint is paint made specifically for use on interior walls. It is much thinner than ceiling paint and often requires at least two coats to cover underlying paint or marks on the wall fully. Due to its thinness, wall paint is more prone to dripping. Wall paint often comes in a variety of colors and finishes, including flat, eggshell, high gloss, and satin. You can also choose between water-based and oil-based wall paint depending on the surface—but we always recommend water-based paint for indoor use due to harmful VOCs in oil-based paints. Ceiling Paint vs. Wall Paint When choosing between ceiling paint and wall paint, it’s important to understand the differences to get the most out of your painting project.
By David Kranker November 5, 2024
Interior painting is a multi-step process, especially when painting over already-painted walls. Part of the painting process is adding a coat of primer to the wall before painting. But, do you really need to prime the walls before painting? The truth is, while it's not always a must, priming can significantly enhance the longevity of your paint job. Knowing when to use primer can be the difference between a vibrant, lasting finish and a lackluster outcome. As professional Grand Rapids painters , we're offering our expert advice about when to grab that primer can and when you can skip it altogether. Whether you're covering up stains, transitioning between colors, or dealing with tricky surfaces, we've got the professional insights you need. What is Primer? Primer is a base coat for your walls, helping the paint stick better and look smoother. It helps cover up flaws on the surface and gives you a nice, even finish. Primer contains an adhesive binder that helps the paint better adhere to the wall to prevent it from cracking, peeling, or bubbling . Primer also blocks stains and stops uneven absorption on surfaces that soak up a lot of paint. While it might seem like an extra step, using a primer is essential to achieving a smooth and long-lasting finish. When Should You Prime Walls Before Painting? There are certain situations where you should definitely prime your walls before painting to ensure a long-lasting paint job with even coverage. Painting a Porous Surface Painting directly over surfaces like drywall or untreated wood without a primer can make the paint job uneven and less durable. These materials soak up paint fast, which might mean you need extra coats to get the right look. Using primer creates a barrier that stops the surface from absorbing too much paint. This helps the paint go on smoothly and adhere better, making sure your paint job lasts. To get the best results, use a primer that's made for the material you're painting. Make a Drastic Color Using primer when changing from a dark color to a light one creates a neutral surface. This stops the strong colors from showing through, so your chosen shade looks exactly as you want. Primer also helps the paint stick better and last longer, keeping the new color bright for years. If you’re making a major drastic color change, sometimes a tinted primer can also help bolden your new paint color. Covering Stains or Odor If you're dealing with unsightly stains or persistent odors on your walls, using a primer is a wise choice. Primers are specially designed to tackle tough stains and effectively seal in odors. This is particularly beneficial if someone has smoked inside the house or if there are lingering pet or cooking smells. A good primer acts as a barrier, ensuring that these stains and odors do not seep through and affect the new layer of paint. Expert Tip: If you have mold on your walls , do not paint over it. This will only cause it to grow more underneath the paint. Instead, get rid of the mold before priming and painting. Painting Repaired Drywall Using a primer on repaired drywall is crucial for achieving a smooth, seamless finish. When the drywall is patched or repaired, the surface often contains varying textures and porosity levels that can cause the final coat of paint to appear uneven. Applying a coat of primer helps to seal these inconsistencies, creating a uniform surface that allows for better adhesion and consistent color in the final paint layer. This step is especially important to avoid color mismatches and ensure the durability of your paint job. Painting Over Oil or Glossy Paint When you're working with walls that have an oil-based paint or glossy finish, priming is important. These shiny surfaces can make it hard for paint to stick, which might cause peeling or chipping. A bonding primer helps the new paint stick better by creating a solid base. This type of primer grabs onto the gloss and makes it easier for the new paint to go on. Lightly sanding the walls can also help smooth out bumps, preparing your walls for a perfect finish. Painting New Walls Priming new walls is important for good paint adhesion and appearance. Drywall, which is often used for new walls, soaks up paint unevenly and can look patchy without primer. Using primer also cuts down on the paint you'll need, saving you both time and money. When Shouldn’t You Prime Walls Before Painting? There are some cases where you can skip priming your walls before painting them. Using a Primer-Paint Combo Product Choosing a primer-paint combo product can make your painting job easier. Brands like Behr , Sherwin-Williams , and Benjamin Moore offer paints that include primer. This means you have less work to do since it removes the need for a separate primer step. However, keep in mind that while these are convenient, they may not work as well on difficult surfaces or when changing from a dark to a light color. Always check the label first. Painting Over a Similar Color If your new paint color is similar to the old one, you might not need primer. This saves time and materials because there’s no risk of color bleed-through. This is especially true with high-quality paint that covers well. Just make sure your wall is clean and in good shape before you begin. How Many Coats of Primer Should You Use? To get the best results, it's often a good idea to apply two coats of primer, especially when changing between very different colors or working with porous surfaces. Make sure each coat is completely dry before starting the next one. Keep in mind, patience is key—a well-prepared surface can make your painted walls look much better. Does Primer Have to Be Perfect? When you're applying primer, it's not about being perfect, but you should aim for an even and smooth coat. This helps the paint stick better, giving your walls a nice finish. Don't worry about small streaks or brush strokes in the primer. Instead, make sure the primer is applied evenly. This will help make your paint job look great in the end. What Wall Primer Should You Use? Choosing the right wall primer for interior painting is essential for a durable and beautiful finish. Opt for a high-quality drywall primer, especially for fresh drywall. If you're painting over a glossy or oil-based surface, a bonding primer can improve paint adhesion. Remember, selecting the appropriate primer based on your wall’s material and condition makes all the difference in achieving that professional look. You’ll also want to choose a primer with the same base as your paint. For example, water-based paint requires a water-based primer, while oil-based paint requires an oil-based primer. Get Pristine Interior Painting from the Professionals at VanDerKolk Painting If you're looking to refresh your home with confidence, hiring professionals like VanDerKolk Painting is the way to go. Our skilled West Michigan team ensures your walls look flawless every time. From tricky surfaces to just the right color, we deliver top-notch quality. We service a large portion of West Michigan, including Kent, Muskegon, Allegan, Ottawa, Barry, and Ionia counties. Don't risk your home's appearance with a DIY job; let the experts handle your painting. Request a free estimate or call us to discuss your ideas and get the stunning interior you deserve.
By David Kranker October 21, 2024
Want to update your kitchen without the expense of renovating your kitchen? Painting your kitchen cabinets can drastically change how your kitchen looks and feels. As interior designers start to move away from the dark cherry wood that was popular ten years ago and recommend white and light color cabinets, a simple coat of paint can instantly upgrade your kitchen. You’ve probably painted your kitchen walls before but have never touched your kitchen cabinets. They require a different painting process, where steps should not be skipped so you can get the best results. So, if you’re looking to update your kitchen on a budget, this is your professional guide on how to paint kitchen cabinets—and it will only take you a weekend to do! How to Paint Kitchen Cabinets Painting your kitchen cabinets is a medium-sized task that can definitely benefit from some extra helping hands. It’s important that you follow all of these steps and don’t skip any! Step 1: Remove Doors, Drawers, and Hardware The very first step to painting kitchen cabinets is removing the doors, drawers, and any hardware. Place your doors and drawers on a flat surface—this will make the prep and painting process much easier! Place the screws, hinges, and handles in a separate bag and label them so you know which cabinet they belong to. You’ll thank yourself later when it’s time to put them back together. Step 2: Protect Surroundings Painting is a messy job. You want to avoid dripping paint on your kitchen appliances and counters. Lay down plastic or cloth on your counters and use painter’s tape around corners and edges. Step 3: Prep the Cabinets Your kitchen cabinets go through a lot of wear and tear, opening and closing multiple times a day. Before painting them, it’s essential to fix any cracks or nicks with wood filler. You want to create a smooth surface to apply the paint evenly. It’s also important to clean the cabinets thoroughly. A gentle grease remover and a damp cloth will do the job. Wait for the cabinets to dry completely. Step 4: Sand with Medium Grit Sandpaper Kitchen cabinets often have a thick coating on them, making it difficult for paint to adhere to the surface. To remove this coating, use a medium grit sandpaper (either 100 or 150 grit) to sand away the surface. Make sure to wipe away any dust with a damp cloth and wait to dry. Step 5: Apply Primer We recommend using an acrylic primer when painting kitchen cabinets. Applying an even coat of primer will help cover the color underneath and hide any scratches. Plus, a high-quality primer will improve the paint’s adhesion to the surface, resulting in a longer-lasting paint job. Step 6: Sand with Fine Grit Sandpaper Once the primer has dried, it’s time to sand the surface again. This time, you’ll use fine-grit paper (about 220 grit) to even out the surface before painting. Make sure to smooth out any dried drops of primer. Whip away any dust with a damp cloth and wait to dry. Step 7: Paint Your Kitchen Cabinets When your kitchen cabinets are completely dried, it’s time to add your first coat of paint. We recommend using a microfiber paint roller for the large, flat surfaces and going in with a brush for the smaller nooks and divots. Before adding a second coat of paint (highly recommended!), wait for the first to dry completely. This will prevent bubbling and peeling later on. Step 8: Sand the Cabinets Again After the last coat of paint has dried completely, it’s time to sand again with fine-grit paper. This is to sand away any imperfections and smooth out the surface once and for all before putting your cabinets back together. What Kind of Paint Should You Use for Kitchen Cabinets? The most commonly asked question about how to paint kitchen cabinets is what paint to use. Choosing the right paint will ensure proper coverage and long-lasting durability. Paint finishes like satin and high gloss also add another layer of protection. We recommend using an enamel-based or acrylic paint for kitchen cabinets. These paints are extremely durable and can withstand high-traffic areas, like your cabinets opening and closing daily. While some homeowners may lean towards using oil-based paint because it is the most durable, we suggest avoiding it due to the high amounts of harmful volatile organic compounds (VOCs) , especially in a room where food is prepared. Can You Paint Kitchen Cabinets without Sanding? Remember how we mentioned that you should follow every single step in this article? Sanding your kitchen cabinets before painting them is a non-negotiable. If you skip this step, your paint likely will not adhere to the surface and will chip within weeks. Should You Use a Roller or Brush to Paint Kitchen Cabinets? Both! For the best coverage and efficient painting, we recommend using both a microfiber roller and a brush. The roller will help you apply an even coat on large, flat surfaces, while the brush will help you get into the smaller sections and details of the cabinets and drawers. How Long Should You Wait Before Putting Cabinets Back Together? After the kitchen cabinets have dried completely, we recommend waiting another 24 hours to ensure the paint will uphold the project. Avoid cleaning your cabinets for at least a week after putting them together. Can You Just Paint Over Kitchen Cabinets? No. Unfortunately, painting kitchen cabinets requires more steps than simply painting over the varnished wood or previous paint coating. It requires repairs, cleaning, and sanding before putting a new coat of paint on them. Can You Paint Kitchen Cabinets on Your Own? It’s absolutely possible to paint your kitchen cabinets on your own. But we won’t sugarcoat it; painting kitchen cabinets takes a lot of time and effort. From dismantling to repairing to sanding to actually painting your cabinets, this task can eat up your entire weekend. If you want the best outcome for your painted kitchen cabinets, then we recommend working with professional painters like VanDerKolk Painting . We have all the tools and experience necessary to do a quick, efficient, and pristine paint job for your kitchen cabinets. Refresh Your Kitchen Cabinets with VanDerKolk Painting Are you looking to give your kitchen a little upgrade by painting your cabinets? Then look no further than the cabinet painters at VanDerKolk Painting! For three decades, we have helped homeowners in the Grand Rapids area refresh and update their homes with professional painting services. From interior to exterior painting, no job is too big or small for our professional painters. This is your sign that your kitchen cabinets are ready to breathe new life into the heart of your home with a brand-new coat of paint. Request a free estimate for your kitchen cabinet painting project to get started today!
By David Kranker October 11, 2024
When it comes to a painting project, there are many decisions to make. Deciding between colors, finishes, and paint brands can overwhelm you. But then you also have to decide which type of paint to use—acrylic or latex paint. This might be one of the more difficult decisions as it requires you to know the pros and cons of both acrylic and latex paint, which surfaces they adhere to best, and how they will hold up over the years. Don’t worry—that’s where we come in! The professional painters at VanDerKolk Painting are here to help you learn the differences between acrylic and latex paint so you can make a smart and informed decision for your next painting project. The Importance of Choosing the Right Type of Paint for Your Project You’re going to spend quite a lot of time and money when painting something in your home. Whether it’s a wall, ceiling, cabinet, or an exterior part of your home, a painting project is no easy feat. You want all of your labor and investment to hold up over the years, which is exactly why choosing the right type of paint is so important. There are three popular types of paint: acrylic, latex, and oil. However, oil-based paint is used much less often due to the harmful volatile organic compounds (VOCs) it emits in the air. Each paint has its uses, benefits, and downfalls, though. Before going to your local hardware store to choose a paint color, make sure to research which type of paint is best. (Which is exactly what you’re doing now!) This will save you a lot of headaches down the road and keep your paint in great shape. What is Acrylic Paint? Acrylic paint is a water-based paint mixed with chemical compounds and acrylic resin. It is durable and great for professional or experienced painters who wish to paint a variety of surfaces both indoors and outdoors. It is one of the most popular paint choices for home projects. When Should You Use Acrylic Paint? Thanks to its durability and mold resistance, acrylic paint is an excellent choice when painting high-traffic areas, humid environments, or outdoor items. It also adheres especially well to metal surfaces. If you consider painting any of the items or rooms listed below, we recommend using acrylic paint. Bathrooms Trim and Doors Cabinets Window Frames Outdoor Furniture Doors Pros and Cons of Acrylic Paint When deciding which paint to use for your project, it’s important to understand the good and the bad to help you make a more informed decision. Pros of Acrylic Paint Better elasticity and expansion during temperature changes Extremely durable Resistant to sunlight Adheres well to wood and metal surfaces Thick hard film after drying Mold and mildew-resistant Cons of Acrylic Paint Limited sheen options Higher VOC levels More difficult to paint with Longer drying times More expensive than latex May not coat evenly on flat surfaces Potential for cracking if applied quickly What is Latex Paint? Latex paint is also a water-based paint that is very popular for home projects. It is a great option for beginner painters and DIY-ers who want an easy-to-manage paint. It is safe to use indoors as the VOC levels are very low, so you can safely use it around children and pets. Latex paint offers smooth coverage and is extremely versatile when it comes to surfaces and items. When Should You Use Latex Paint? The best time to use latex paint is for indoor projects. Low-traffic areas, large projects, and surfaces that do not expand are perfect for latex paint. There are some exceptions to using latex paint outdoors, especially when you want to paint concrete or stucco. If you plan to paint any of the following projects, then it’s a good idea to choose latex paint. Ceilings Interior walls Plaster and drywall Stucco Aluminum siding Crown molding Accent walls Closets and storage areas Concrete Indoor wooden furniture Pros and Cons of Latex Paint When deciding whether to use latex paint for your project, it’s important to consider the pros and cons. Pros of Latex Paint Quick drying Easy to apply Lower VOCs Easy to clean with soap and water Many finish options Moisture-resistant Less expensive than acrylic Cons of Latex Paint Could expose brush strokes Grain swell if painted on wood Rigid and not flexible Less durable than acrylic Is Acrylic or Latex Paint Better? Both acrylic and latex paints are excellent choices when painting your home, furniture, or outdoor furniture and items. They are top-quality paints with proven formulas. Saying whether acrylic or latex paint is better in general is impossible. However, acrylic paint may be better for one project, such as painting a bathroom, than latex paint. It all depends on your project and painting experience. Overall, both acrylic and latex are great paints and popular choices. What to Consider When Choosing Between Acrylic and Latex Paint Now that we’ve determined that both acrylic and latex paint are great choices, let’s explore what you should consider when choosing between them. Surface Consider the surface of what you would like to paint. Depending on the surface material, such as metal, acrylic may be a better choice because it adheres better. While ceilings, which are often untouched, are ideal for latex paint because they are large, smooth surfaces. Feel free to reference the sections above about what items and projects go with each type of paint if you need some guidance. Location Where do you want to paint—indoors or outdoors? If you have an outdoor painting project, then you will likely want to choose acrylic paint every time because it is more durable than latex. However, if you have a large room that you want to paint, then latex is the better choice because of low VOC emission. Dry Time Latex tends to dry faster than acrylic. It only needs about one to two hours to dry to the touch and only four hours before you can paint another coat . Acrylic paint requires four to six hours to dry to the touch, and six or eight before you can add an additional coat. Consider how large your project is and how much time you have to dedicate to it, especially waiting for it to dry when choosing between acrylic and latex. Budget You might also have to consider your budget. Latex paint tends to be less expensive than acrylic. However, since acrylic is more durable, it could justify investing a little more into your project. However, we will leave this decision up to you! Let VanDerKolk Painting Handle Your Painting Project We understand that researching and learning about different types of paint can put a damper on the fun project you want to start. That’s why VanDerKolk Painting is here to help you with all of your painting needs—no matter how small! Our professionals will select the right type of paint to ensure longevity and durability for your home , workplace , or industrial space each and every time. We will work with you to plan your painting project down to every detail, from prep to clean up, to make sure you’re happy with the outcome. Don’t worry about choosing the wrong paint, request your free painting estimate from VanDerKolk Painting and let us handle your painting project for you.
By David Kranker September 25, 2024
Your bathroom is one of the harshest environments for paint. Subject to humidity, steam, and potential mold growth , choosing the right type of paint for your bathroom is absolutely essential for a long-lasting and beautiful paint job. As you research paint and review all of your options, it can be difficult to know which type of paint is ideal for bathrooms. Picking out paint for your bathroom is about more than just choosing a color . It’s about picking the right kind of paint that will adhere to your bathroom walls and withstand the humid environment of daily showers. The painting professionals at VanDerKolk Painting are here to share the best type of paint for bathrooms, things to consider when choosing a paint, and helpful tips for elevating your bathroom with a fresh coat of paint. What to Consider When Choosing Paint for the Bathroom Before we get to which type of paint is best for bathrooms, let’s first discuss what you should consider in the paint you choose. Moisture Resistant Your bathroom is likely the room in your home with the most moisture in the air. Think about it; after a long shower, the air is clouded with steam, and the mirror has fogged up. This isn’t the most ideal environment for your standard paint. When looking for paint for the bathroom, choose one that has moisture resistance or is even waterproof. This will prevent the paint from bubbling or peeling due to the moisture in the air. Antimicrobial Additives Bathrooms are prone to mold growth due to the humidity and moist environment. If your bathroom is not properly ventilated, choosing paint with antimicrobial additives can help prevent fungus and bacteria from spreading and growing on the walls. Durability The main culprit of damaged paint in a bathroom is moisture. Choosing a paint that holds up against humid environments and can withstand washing with soap and water will prolong the quality of the paint job and its color while keeping your bathroom looking luxurious and pristine. What is the Best Type of Paint for Bathrooms? The best type of paint for bathrooms is an interior acrylic-latex paint with a gloss finish. This paint is easy to apply, quick to dry, and durable against moist environments. Although there are paints made specifically to withstand the harsh environment of a bathroom, they often cost twice as much as a water-based acrylic latex interior paint. Both paints are perfect for your bathroom, depending on your budget. No matter what type of paint you use for your bathroom, whether it is bathroom-specific or an interior acrylic-latex, we recommend painting at least two coats over a coat of primer for optimal adhesion and coverage. Is Oil-Based Paint Good for Bathrooms? Oil-based paint is known for its extreme durability over time and water resistance. However, it is not recommended to paint on bathroom walls due to harmful volatile organic compounds (VOCs) found in the paint. Typically, using oil-based paint requires good ventilation, which is difficult to get in a standard bathroom. If you wish to use oil-based paint in your bathroom, we recommend using it for high-traffic items such as trim or doors. We do not recommend using it for the bathroom walls. What is the Best Paint Finish for Bathrooms? Now that we’ve determined the best type of paint for bathrooms, it’s time to discuss the different paint finishes. Glossy finishes tend to perform better in bathrooms because they do not absorb moisture compared to a flat or matte finish. Satin Finish A satin finish paint offers a slightly iridescent sheen to the walls that protects them from moisture. This paint finish is easy to gently wipe clean from soap or drops of toothpaste without damaging the paint. Pros of Satin Finish Easy to clean Moisture-resistant Easy to apply Cons of Satin Finish Cannot scrub to clean Difficult to re-paint individual areas Semi-Gloss Finish A semi-gloss finish offers a more glossy finish than satin. This lightly reflective finish creates a luxurious feel to your bathroom while preventing mold growth by shedding moisture droplets. Pros of Semi-Gloss Finish Moisture-resistant Durable in humid environments Easy to clean Cons of Semi-Gloss Finish Can be too shiny Shows wall imperfections High-Gloss Finish The best paint finish for bathrooms is a high-gloss finish, but it is not the most popular due to its extreme shine. For smaller bathrooms, the mirror-like finish can be offputting and make the room feel overwhelming. However, a high-gloss finish is the most durable, tough, and moisture-resistant. Pros of High-Gloss Finish Can wash and scrub clean Extremely durable Moisture-resistant Cons of High-Gloss Finish Too shiny Shows wall imperfections Is Matte or Eggshell Paint Finish Good for Bathrooms? Ideally, matte and eggshell paint finishes are best used in rooms that do not have a humid environment. These flat paints are more likely to absorb moisture, causing mold growth in the walls. If you are adamant about painting a bathroom with a matte, flat, or eggshell paint finish, then we recommend using it in a powder room, which does not have a bathtub or shower. Should You Hire a Professional to Paint Your Bathroom? While hiring a professional to paint your bathroom isn’t necessarily required, it is a huge help! From prepping the walls to choosing the right paint to ensure precise paint application, a professional guarantees the perfect paint job every time. Plus, when you hire a professional painter, you get your well-deserved weekend back instead of slaving over the bathroom and painting the walls, ceiling, trim, and doors. When you work with a professional, you simply have to choose a color and open the door to let them in! Elevate Your Bathroom with a Fresh Coat of Paint from VanDerKolk Painting Are you ready to give your bathroom the refresh it deserves? As one of the second-most used rooms in the house, your paint can tend to fade, peel, or flake over the years. Applying a fresh coat can instantly elevate your bathroom and open the door to fully transform it to match the vision you have. You can save time and headaches painting your West Michigan bathroom with help from the professional Grand Rapids painters at VanDerKolk Painting ! With over three decades of experience painting residential homes in the Grand Rapids area, our team of professional painters is ready to help you choose your color, prep your walls, and apply the right type of paint to your bathroom walls. Request a free estimate to paint your West Michigan bathroom today!
By David Kranker August 28, 2024
The kitchen is considered the heart of the home. As the most used room in a home , its walls see the most traffic, stains, moisture, and, dare we say, the occasional cloud of smoke. While kitchens offer comfort and satisfaction, they can also be a harsh environment for the paint on their walls. As homeowners spend the majority of their time in the kitchen cooking, socializing, and enjoying, they want a beautiful and luxurious space with vibrant-colored walls and paint that doesn’t look dull or chip over time. To achieve this feel and look, it’s essential to choose the best type of paint for kitchens. By the end of this article, you’ll know which type of paint to use in your kitchen to get long-lasting color and durable coats as you cook your favorite meals and talk with your favorite people. Remember, if you don’t want to go through the hassle of finding the perfect type of paint, VanDerKolk Painting is here to choose the right paint for your kitchen and provide precise and professional painting services to revive your kitchen. What to Consider When Choosing Paint for the Kitchen  As the kitchen is considered a high-traffic area with many different activities, it’s important to consider certain features in the type of paint you choose. Washability The best type of cooks are the messy ones, right? When you accidentally splash some tomato sauce on your wall, you want the ability to easily wipe it away without staining the paint on the wall. When choosing the best type of paint for your kitchen, consider how easy it is to clean. Can you simply take a wet cloth and wipe it down, or does it require more elbow grease than that? Moisture-Resistance From boiling pasta to using your kettle for tea, your kitchen walls are prone to moisture, which can lead to mold growth over time. Choosing a moisture-resistant paint will prevent mold, chipping, and peeling , leading to a longer-lasting paint job. Durability The number one reason homeowners paint their kitchens is for aesthetics. They want a color that creates the perfect backdrop to their dream kitchen. Choosing a durable paint that won’t fade or chip over the years is key to achieving a beautiful and enduring aesthetic. What is the Best Type of Paint for Kitchens? The best type of paint for kitchens is water-based acrylic interior paint. It is washable, moisture-resistant, durable, easy to clean, and quick drying. Acrylic paint has all of the fantastic qualities you need in paint for your kitchen walls that will provide longevity. Remember, always use a water-based primer with your water-based acrylic paint for the best adhesion and long-lasting paint job. What Paint Finish is Best for Kitchen Walls? So, we’ve established the best type of paint for kitchen walls is acrylic, but what is the best paint finish to use? If you’re unfamiliar with painting terms, a paint finish is the measure of gloss or light reflectiveness the paint has. The paint finish you choose for your kitchen also affects its durability. Satin Paint Finish A satin paint finish is easily the most popular type of paint finish used in kitchens today. It displays an almost velvet look on the wall, creating a cozy and comforting aesthetic. Pros of Satin Paint Finish Easy to clean Moisture-resistant Durable Great for high-traffic areas Cons of Satin Paint Finish Difficult to apply Exposes imperfections on the wall More expensive Overall, satin is the ideal paint finish for kitchens that are heavily used, require routine cleaning, and have people moving in and out constantly. Eggshell Paint Finish An eggshell paint finish offers a slight sheen to the wall. Think of how light reflects off an actual egg when you hold it - that’s exactly how an eggshell finish will look on your kitchen wall. Pros of Eggshell Paint Finish Inexpensive Hides imperfections on the wall Cons of Eggshell Paint Finish Not moisture-resistant Better in low to medium-traffic areas Difficult to clean If you choose to use an eggshell paint finish, it is best to place it in areas with minimal movement to avoid chipping or scratching, and does not require much cleaning. Semi-Gloss Paint Finish A semi-gloss paint finish reflects light beautifully, brightening the kitchen. This is the perfect finish for kitchens that tend to be naturally dark due to a lack of windows or low lighting. Pros of Semi-Gloss Paint Finish Room brightening Resistant to stains and mildew Easy to clean Durable Moisture-resistant Cons of Semi-Gloss Paint Finish Expose imperfections on wall Difficult to apply Difficult to paint over Overall, semi-gloss is our second favorite paint finish for kitchen walls, thanks to its durability, moisture resistance, and room-brightening qualities. High-Gloss Paint Finish If you like the idea of light reflecting from your kitchen walls and really want to play off of that, then a high-gloss paint finish may be a great choice. It is more reflective than a semi-gloss finish and transforms the look of your kitchen as the light changes throughout the day giving it a luxurious aesthetic. Pros of High-Gloss Paint Finish Durable Light reflective Easy to clean Bold color choices Cons of High-Gloss Paint Finish Exposes scratches and imperfections Requires constant cleaning Expensive If you are willing to invest time in maintaining your kitchen paint and love the durability and light reflective qualities of high-gloss paint, then this is another great paint finish option. Is Matte Paint Finish Good for Kitchens? You may have noticed that we did not mention flat or matte paint finishes as being one of the best for kitchens. While these are easy to find and often more affordable, they do not have the qualities needed for a long-lasting paint job in a kitchen. They tend to be less durable, not resistant to moisture and can chip easily, causing your kitchen to look outdated and rundown. Overall, it’s best to avoid matte and flat finishes in the kitchen. What Type of Paint is Best for Kitchen Cabinets? We’ve spent most of this article discussing the best type of paint for kitchen walls, but there is more to paint than just your walls. Many homeowners choose to paint their kitchen cabinets to revive and transform their kitchen spaces. When your cabinets are made of wood, the best type of paint to use is a water-based or hybrid enamel. It is highly durable and has a hard finish that can resistant scratches and chips. This type of paint is also very thick, requiring fewer coats to achieve an even and bold look. Should You Hire a Professional Painter to Paint Your Kitchen? While it is not absolutely necessary to hire a professional painter to paint your kitchen, the benefits of having a pro do it for you are undeniable. The first thing you’ll notice is the time that it saves you. Just think, when you hire a professional painting company like VanDerKolk Painting, you don’t have to spend your time researching the best type of paint to use in your kitchen and why. They can choose the right one for you based on their professional experience! Let’s also not forget the weekend you’ll get back. Instead of preparing and painting your kitchen, you can sit back, relax, and enjoy your time off, knowing your kitchen is being painted with precision and perfection. Transform Your Kitchen with a Fresh Coat of Paint from VanDerKolk Painting It’s time to revive your kitchen walls and give them the protection they need from the moisture, stains, and movement in your kitchen every day with a professionally applied fresh coat of paint! VanDerKolk Painting has served the Grand Rapids area for more than three decades, dedicating our precision to helping homeowners create their dream interior spaces. From consultations about the right type of paint and color to strategizing a plan of action to cleaning up the mess when we’re done, we’ve got you covered. Request a free estimate for your kitchen painting project to get started with us today!
More Posts
Share by: